Monday, June 23, 2008

Build a USB Bit Whacker in 10 minutes


I've moved!  Please go here: http://bafoontecha.com/2008/06/23/build-a-usb-bit-whacker-in-10-minutes/ for the latest version of this article.

Every so often you come across a reinvention of an old idea that blows you away, not only in its elegance but in its sheer utility.  For me, this occurred a few weeks ago, when I came across the USB Bit Whacker.  The name was familiar, I'd surely seen it while browsing the Sparkfun product catalog, but for some reason the description hadn't compelled me to click.  

First, a bit of history...  In the good-old days, computers came with these things called "parallel ports", or so I've been told (should that be active tense?)  These "parallel ports", with a bit of register twiddling, empowered the user with 17-some-odd digital pins for inputting and outputting data.  Newer computers computers tend to forgo parallel I/O methods for faster and sleeker I/O methods, ala, USB, USB, and USB.  While these newer generation of I/O ports are much more compact and support higher bandwidths, they are a bit harder for the common user to interface with.

In comes the USB Bit Whacker.  Calling the USB Bit Whacker a virtual parallel port is doing it a disservice; it's much, much more than that.  It gives you complete control of a fairly powerful microcontroller, the PIC18F2550, through a serial, command-driven interface.  The entire platform is powered from the USB bus, no wall-warts or additional wires!  In addition, all communication occurs through a virtual serial (COM) port, using the USB CDC protocol.

Simple ASCII commands allow you to configure and use the following onboard hardware peripherals: SPI/I2C module, USART serial module, PWM module, and 13-channel 10-bit Analog-to-Digital converter module.  Support for additional modules can easily be added to the open-source firmware.

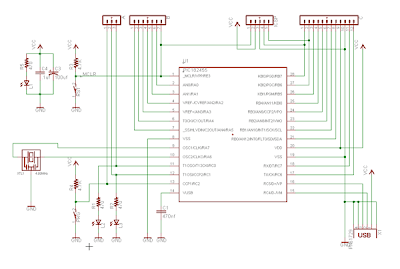
I love microcontrollers, and primarily due to the generosity of Microchip, have a number of PICs in my parts collection.  I came across the USB Bit Whacker project while desperately trying to get USB CDC working on a PIC18F2550.  Encouraged by the extreme simplicity of the schematic , I decided to breadboard it.  In a matter of minutes, I had a working development kit.  You can either buy a kit, or follow these instructions to build your own.
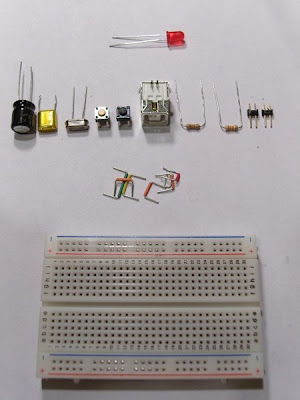

Requirements
  • 220 uF  electrolytic capacitor
  • 0.1 uF capacitor
  • 20 MHz oscillator (see the PIC18F2550 datasheet or additional options)
  • 2 push buttons
  • 1 USB Type B connector
  • 2 3.3k resistors (the value of the pull-up resistor is not critical)
  • 2 pieces of straight headers
  • A few jumper wires
  • A breadboard/perfboard
  • 1 PIC18F2550 or PIC18f2450 microcontroller
  • PIC Programmer
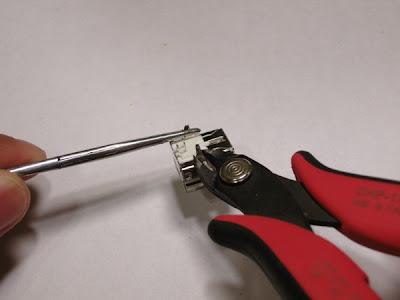
Hardware Construction


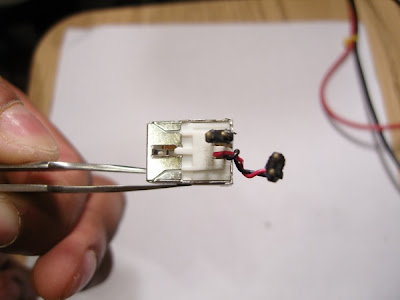
Prepare the USB connector by cutting off the mounting brackets


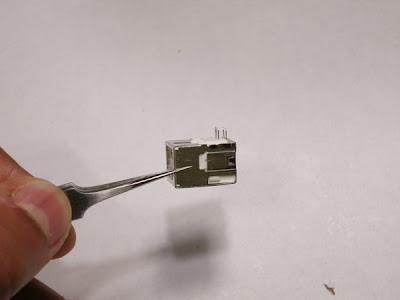
It should look something like this


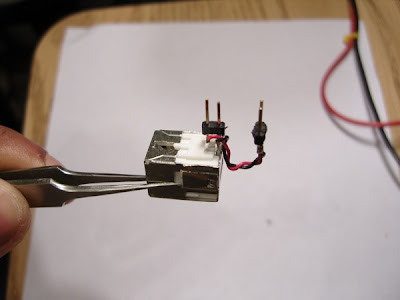
Solder the header pins to the USB connector.


Alternate view

Original schematic (Credit: Brian Schmalz)


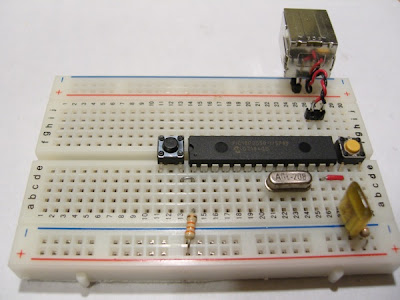
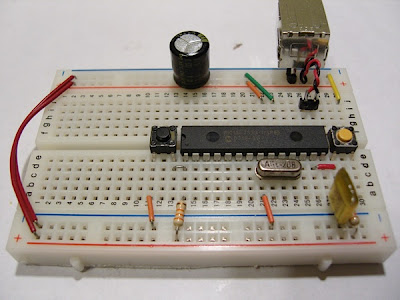
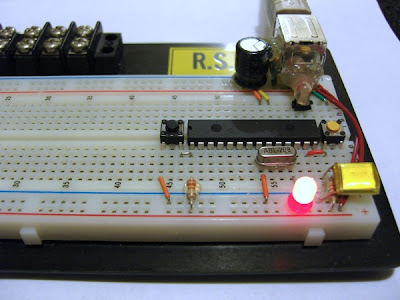
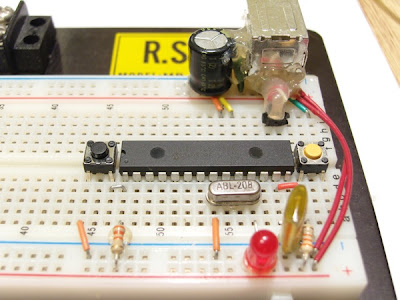
Begin placing the components on the breadboard


Completed breadboard USB Bit Whacker.  (I left out the status LED)

Software

Now that you have a completed Bit Whacker, you need to burn the bootloader onto your PIC.  Instructions for burning firmware onto your PIC are out of the scope of this document.  Luckily, you can find a wealth of information online.  I use an MPLAB ICD2 clone that I purchased on eBay.  

If you are using a 20 MHz oscillator, you can use this bootloader firmware.  Additional bootloader firmware is available on the USB Bit Whacker homepage (Search for 'Bootloader').  (I know this is confusing, but the *Bootloader* firmware is different than the USB Bit Whacker firmware.  You need to burn the *Bootloader* firmware onto your PIC first using a dedicated PIC programmer.  After this, additional firmware updates can be done through the USB port!)

Bit Whacker in Bootloader mode

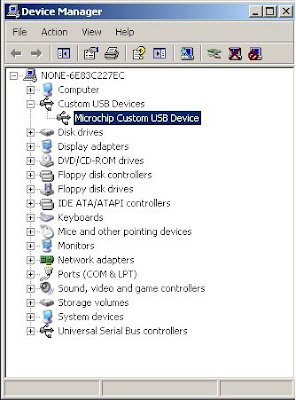
Once you've burned the Bootloader firmware onto your PIC18F2x50, you need to load the Bit Whacker firmware.  Microchip provides a USB Framework, which comes with an application named PDFUSB.exe.  Using PDFUSB, you can load Bit Whacker firmware onto your PIC.  To prepare the PIC for loading firmware serially, you need to connect your development board to a USB port on your computer.  Then, while holding down the "Program" button (the orange pushbutton in the picture above), press and release the "Reset" button (the black pushbutton in the picture above).  The status LED on the prenatal USB Bit Whacker should be steady, and a Custom USB Device named "Microchip Custom USB Device" should show up in your Device Manager.


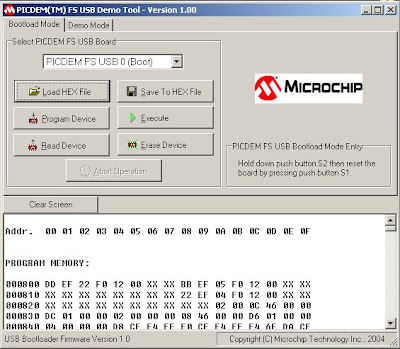
Download the latest USB Bit Whacker firmware, here.  At the time of writing, this was v1.4.3.  Load the PDFUSB.exe bootloader and select the firmware and the USB Board as follows:


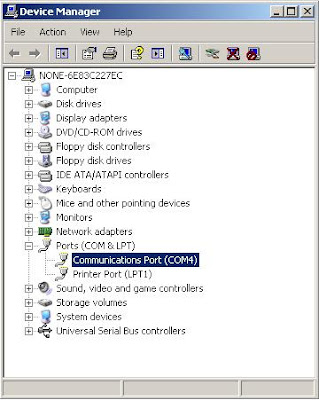
Click on "Program Device" to load the firmware onto the PIC.  Once the loading is complete, hit "Execute" to switch to the USB Bit Whacker Firmware.  The status LED on the breadboard should begin to blink.  Looking in your Device Manager, you should have a new COM port.  On my machine, this shows up as COM4.


Now, open you serial emulator of choice (HyperTerminal, teraterm, etc...)  and open up the serial port.  If you're using a Mac, try "screen /dev/tty.usbmodem1d11 57600".

Type the following commands to set Port A on the Bit Whacker to analog input, and to set a timer to output values of the analog pins at a 100ms interval (Unfortunately, you won't see what you are typing, so if you think you've made a mistake just hit "Enter" and try again.  The next revision of the firmware should fix this.  Also, this isn't as big a problem as it seems now, keep reading!)
c,31,0,0,5
t,100,1
The first line calls the "Configure" command indicating that all five available pins on Port A are inputs, all the pins on Port B are outputs, all the pins on Port C are outputs, and the 5 Port A pins are analog inputs.

The second line calls the "Timer" command with an interval of 100 ms, in analog mode.

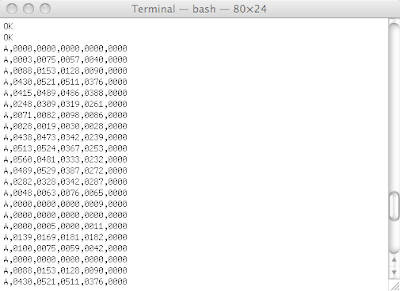
You should see a stream of 0's filling your terminal window.  Try touching a few of the pins (2-7) to see the numbers change!  You now have a rudimentary, but fairly powerful DAQ at your fingertips.  

Term output

Further instructions on using your Bit Whacker can be found here.

Advanced Example


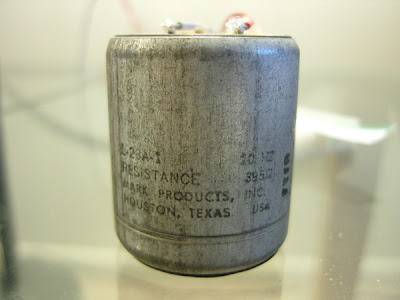
The major advantage of having a command-driven interface is that it is easily scriptable.  I like to write small Python scripts to control my USB Bit Whacker.  I had an old Geophone from EPO Depot laying around my parts bin.  If you click the link, you can see that a Geophone is a simple electromagnetic device which generates a voltage based on the displacement of a magnetic mass.  It's useful for detecting low-frequency vibrations such as earthquakes, footsteps, and in some cases, a combination of both.  


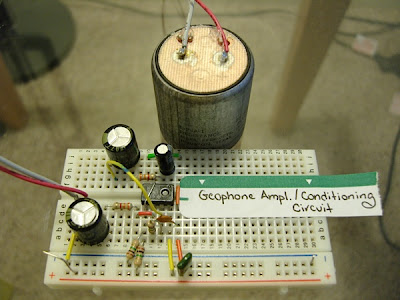
Scoping the output of the Geophone, I determined that the maximum voltage swing was around 4VPP (shaking it violently).  The average VPP was around 100 mV.  I wired up a quick op-amp circuit to center the Geophone output to 2.5V (1/2 the Bit Whacker rail voltage) and add a fair bit of amplification.  I rely on the fact that the opamp can not exceed its supply rail voltage to protect the Bit Whacker inputs.  This is generally not a good design practice, but hey, I was in a hurry.

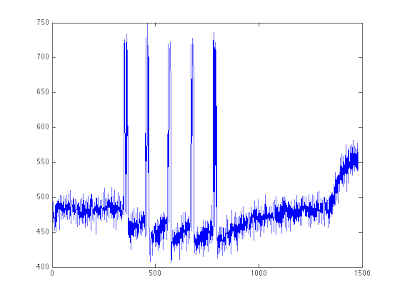
I then wrote a Python script to capture the analog output of the Geophone at a sampling rate of 200 Hz.  Download it here.  

Plot of captured footstep data

The plot above is of four footsteps near the Geophone.  From the plot, I suspect the op-amp is latching up, but that's something I'll save for another post!

Additional Notes

I've made a number of Bit Whackers over the last few weeks and have made many modifications to the firmware, including adding SPI and I2C support.  I've sent the changes to the developer, Brian Schmalz, who will hopefully roll them into the next firmware revision.

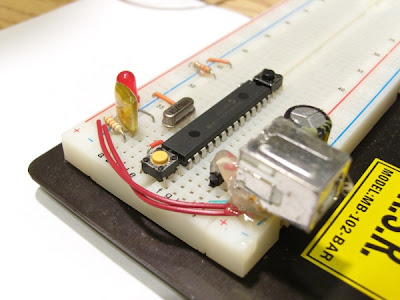
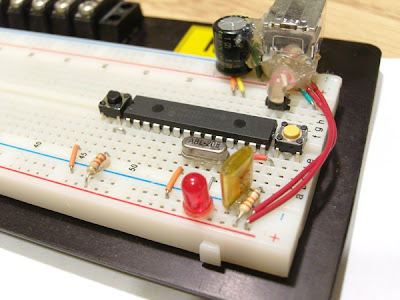
Here are a few pictures of the other Bit Whacker's that I've built.  One way to prevent components from moving around is to hot-glue them.


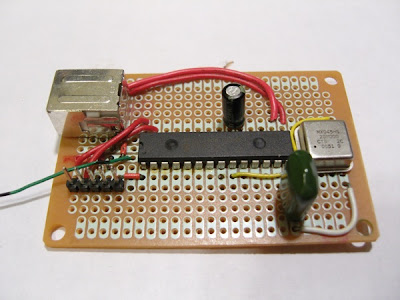
Perf-board USB Bit Whacker

Thanks,

Sumanth P.

Powering your Technological Arts NanoCore C32 Development board

To help keep my series of articles on microcontroller development on Mac OS X concise, I've decided to spin-off somewhat tangential topics into their own posts.  Here's mini-post on powering the Technological Arts NanoCore C32 development kit.


Jumper JB1

This Tech Arts development kit is compact and has relatively meager power requirements for a microcontroller board running at 24 MHz.  In addition, the devkit uses a LM1086 Adjustable LDO Voltage Regulator and provides a jumper (JB1) to conveniently switch between 3.3V and 5.0V operation.  I loaded up the basic "helloworld" example from Part 1, and measured the power consumption at both voltages with and without a serial cable connected:
  • 3.3V, 16.7mA w/o serial port
  • 3.3V, 68.0mA w/ serial port
  • 5.0V, 17.6mA w/o serial port
  • 5.0V, 76.2mA w/ serial port

Left/Top: 5.0V operation (JB1 open), Right/Bottom: 3.3V operation (JB1 closed)

While hacking code in the lab, using a wall-wart is fine, however, the low power requirements of this devkit give you a variety of options when taking your project on the road.  I've powered my board using the following:

A standard AA battery pack provides around 6800 mAh - 12,000 mAh of battery life.  


Alternate view


A generic 3.7V, 0.2W solar panel, which gives you a laaaarge number of mAh.  
Remember to set jumper JB1!


Cell-phone battery packs are great sources of power.  This is an
old Envoy 3.7V 900mAh Li-Ion cellphone battery pack I had lying around.  
I use the Sparkfun MAX1555-based charger to recharge the battery pack.  
The usual warnings about Lithium-based rechargables apply!!!


Sunday, June 22, 2008

DIY right-angle headers

I often find the need to stick headers on my microcontroller projects, and I've come to prefer right-angle headers, as opposed to the traditional straight header, due to their unobtrusive, low-profile.  Since right-angle headers are usually in low-supply, here's a couple of ways to make or acquire them from parts you probably have lying around.  (The peripheral in the pictures is the LIS3LV02DQ 3-axis accelerometer)


We start with two pieces of straight header


We want the result to look something like this


Place the two straight headers at a right-angle, and tack solder each set of pins


Now, slide off the connecting plastic from one side.  The pins may twist from side-to-side, don't worry.


The result should look something like this


Complete soldering pins to PCB.  (I use a piece of scrap perf-board to make sure the pins point straight up)


The completed result.


Another angle.

Or...


Salvage headers from an old sound-card (Thanks, Purdue Surplus!)


Carefully, pull off the plastic connector


Apply a bit of flux to the pin pad


"Push" the pins through with a soldering iron


Flip the board over, and continue extracting the pins


Go make something!

Saturday, June 14, 2008

Microcontroller Development Under Mac OS X (Part 1)

I intend for this to be a series of posts explaining how to get up and running developing for the Freescale HC(S)12, Atmel AVR, Microchip PIC, and ARM LPx platforms. These instructions have been tested on my laptop, which runs Mac OS X Leopard. However, there is nothing *explicitly* Mac-specific about what I'll be covering; most of this guide should apply to *NIX platforms, and possibly Windows, too.

Required Development Tools
- a compiler
- a linker/assembler
- a c library
- some way of getting your code on the uC

ATEN International PL2303-based USB-to-Serial

Many modern microcontrollers support self-programming via a serial bootloader.  This feature makes updating firmware a breeze.  While you can find newer development kits with USB-to-TTL converters onboard, a few of the development kits that I'll be discussing use old-fashioned RS-232 serial ports.  My MacBook doesn't have a RS-232 serial port, so I use the generic PL2303-based USB-to-RS232 adaptor that you see above.  You can pick one up for about $20. 

Freescale HC11/HC(S)12 Family

Compiler, Linker/Assembler, C Library

The good folks at the GNU Project provide a free compiler (m68hc11/12) and a set of binary utilities (Binutils). The C library (Newlib) is generously distributed by the folks at Red Hat. While you can compile and install these tools by hand, I chose to use Fink, which installs and manages the files automagically.

At the time of writing a Leopard installer for Fink wasn't available, so I bootstrapped from source.  You can find directions for that here.  (After installing Fink, don't forget to append '/sw2/bin/init.sh' and '/sw2/bin' to $PATH in your ~/.bash_profile.)  My line looks like:

export PATH=/usr/local/cuda/bin:$PATH:/opt/local/bin:/sw2/bin

Open a new terminal window and type the following to install everything in one fell-swoop:

fink install m681x-binutils m681x-gcc m681x-newlib m681x-gdb

After a few minutes, you'll have a full set of development tools installed and ready to go.

If you uncomfortable using the GNU-as assembler, Eric Engler's as12 is a great alternative.  You can download the source code here.  Compiling the code is as simple as typing 'make' in the unzipped directory.  Copy the binary files, as11 and as12, to a directory in your $PATH.

Getting code on your HC(S)12

Two of my development kits, the Freescale DEMO9s12NE64 and the Technological Arts M68DKIT912C32, use the AN2546 serial bootloader.  I found a few tools which support this protocol: hcs12mem, Binload.  I decided to use hcs12mem, mainly because the website for Binload was down when I tried to access it.  Since I couldn't find a binary package for hcs12mem, I decided to compile it from scratch.  You can grab it here and do so yourself.
tar -xzvf hcs12mem-1.4.1.tar.gz
cd hcs12mem-1.4.1
./configure
make && sudo make install
Developing for the HC(S)12

The HC12 will always hold a special place in my heart; it was the first uC that I learned to program for back in ECE362 @ Purdue.  It has a great instruction set: understandable, powerful, and well-supported by Freescale.  Throughout the years, I've programmed for 3 HC(S)12 families: the C32, the NE64, and the DP256.  The corresponding development kits that I have for the three platforms are: Technological Arts M68DKIT912C32,  Freescale DEMO9S12NE64, and the Wytec Minidragon+.

The development process is very similar across the three families;  there are occasionally differences in the pin/register names, memory layout, and supported subsystems.  Pin names are usually defined in a family-specific header file.  I've collected header files for each of the families and made them available below.  For the development tools we are using, the memory layout is defined in a file named 'memory.x'.  Be sure to examine each of the memory.x files in the examples below.  You should also take a look at the 'vectors.s' file.  This is where the interrupt vectors are defined.

The examples below have accompanying Makefiles.  In addition to the standard 'make' target, there is a 'make load' target which attempts to burn the generated .s19 file to the development board using hcs12mem.  You will probably have to modify the serial port path in the Makefile to match your machine.


Technological Arts M68DKIT912C32


Freescale DEMO9s12NE64


Wytec Minidragon+


In my next post, I'll walk through the example code and give you a quick introduction to programming AVRs!  

- Sumanth Peddamatham

Additional Information


How to Compile uip-NE64 Example

Macintosh-5:uip-hcs12NE-bafoontecha me$ make 
m6811-elf-gcc -m68hc12 -Os -fno-ident -fno-common -fomit-frame-pointer -mshort -fsigned-char -mauto-incdec -c ethernet.c
m6811-elf-gcc -m68hc12 -Os -fno-ident -fno-common -fomit-frame-pointer -mshort -fsigned-char -mauto-incdec -c ethernet_stats.c
m6811-elf-gcc -m68hc12 -Os -fno-ident -fno-common -fomit-frame-pointer -mshort -fsigned-char -mauto-incdec -c main.c
m6811-elf-gcc -m68hc12 -Os -fno-ident -fno-common -fomit-frame-pointer -mshort -fsigned-char -mauto-incdec -c netlog.c
m6811-elf-gcc -m68hc12 -Os -fno-ident -fno-common -fomit-frame-pointer -mshort -fsigned-char -mauto-incdec -c timer.c
m6811-elf-gcc -m68hc12 -Os -fno-ident -fno-common -fomit-frame-pointer -mshort -fsigned-char -mauto-incdec -c uip.c
m6811-elf-gcc -m68hc12 -Os -fno-ident -fno-common -fomit-frame-pointer -mshort -fsigned-char -mauto-incdec -c uip_arch.c
m6811-elf-gcc -m68hc12 -Os -fno-ident -fno-common -fomit-frame-pointer -mshort -fsigned-char -mauto-incdec -c uip_arp.c
m6811-elf-gcc -m68hc12 -Os -fno-ident -fno-common -fomit-frame-pointer -mshort -fsigned-char -mauto-incdec -c adc.c
m6811-elf-gcc -m68hc12 -Os -fno-ident -fno-common -fomit-frame-pointer -mshort -fsigned-char -mauto-incdec -Wl,-u,-mm68hc12elfb -o uip-ne64.elf ethernet.o ethernet_stats.o main.o netlog.o timer.o uip.o uip_arch.o uip_arp.o adc.o mc9s12ne_vectors.s
/sw2/bin/m6811-elf-ld:ldscripts/m68hc12elfb.x:127: warning: memory region page0 not declared
m6811-elf-objcopy -O srec uip-ne64.elf uip-ne64.s19

How to Load uip-NE64 Example

Macintosh-5:uip-hcs12NE-bafoontecha me$ make load
hcs12mem -i sm -p /dev/tty.PL2303-0000101D -t mc9s12ne64 -o 25MHz --flash-erase --flash-write uip-ne64.s19
hcs12mem: Freescale S12 MCU memory loader V1.4.1 (C) 2005-2007 Michal Konieczny 

target info 
target mcu family osc <25.000000>
SM serial port baud rate <115200>
SM target connected
SM version <2.01> date <2004-01-16>
S12 part id <0x8201> family memory <64kb> mask <0.1>
S12 part security backdoor key 
S12 register space <1kb> address range <0x0000-0x03ff>
S12 RAM size <8kb> space <8kb> align address range <0x2000-0x3fff>
S12 EEPROM not present
S12 FLASH module state ROMHM 
S12 FLASH size <64kb> space <48kb> off-chip/on-chip space <876kb/128kb>
S12 FLASH protection all high area <2kb> low area 
FLASH erase: wait ...
FLASH erase: memory erased
FLASH write: image file 
FLASH write: image info entry <0x4000>
FLASH write: address range <0x4000-0x6297> size <0x2298>
FLASH write: address range <0xff80-0xffff> size <0x0080>
FLASH write: image [##################################################]
FLASH write: image size <8984> time <1.03> rate <8722>

Connecting to DEMO9S12NE64 Development Board

Macintosh-5:uip-hcs12NE-bafoontecha me$ telnet 192.168.0.20
Trying 192.168.0.20...
Connected to 192.168.0.20.
Escape character is '^]'.

-------------------------------
 Welcome to the DEMOS19NE64!   
-------------------------------
Press bar to terminate.

ADC Port 0: 003D
ADC Port 0: 0098
ADC Port 0: 00BC
ADC Port 0: 00E0
ADC Port 0: 00E2
ADC Port 0: 00FF
ADC Port 0: 00FF
ADC Port 0: 00FF
ADC Port 0: 00F1
ADC Port 0: 00A4
ADC Port 0: 0080
ADC Port 0: 006F
ADC Port 0: 0056
ADC Port 0: 003D
ip: packet not for us.
ADC Port 0: 003D
ip: packet not for us.
ADC Port 0: 003D
ip: packet not for us.
ADC Port 0: 003D
ip: packet not for us.
ADC Port 0: 003D
ip: packet not for us.
ADC Port 0: 003D
ip: packet not for us.
ADC Port 0: 003D
ip: packet not for us.
ADC 
ADC Port 0: 002C
ADC Port 0: 0027
ADC Port 0: 0015
ADC Port 0: 0000
ADC Port 0: 0000Connection closed by foreign host.

Links


theory meets application.